
Introduction
Pull Request deployments are deployments of changes introduced in a pull request to a staging environment for testing purposes. They can be useful for developers and team members because they allow them to review the proposed changes in a near production environment setup before merging them to the main branch.
Why Pull Request Deployments at Kahoot! ?
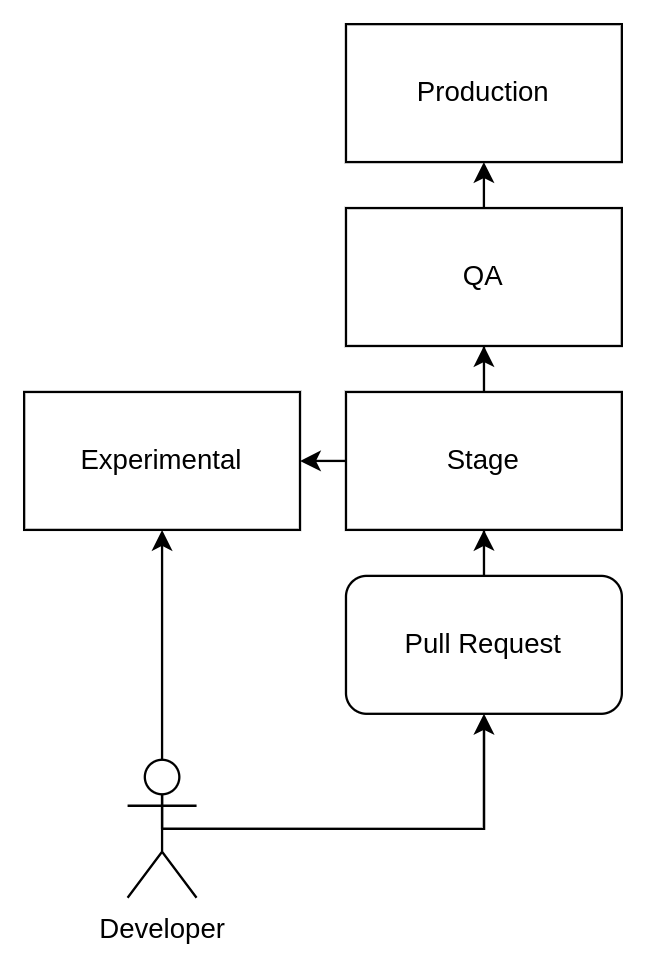
Within Kahoot!, we manage three shared testing environments: “Experimental,” “Stage,” and “QA.”
- Experimental: In this environment developers push changes without prior review, to test modifications in an environment closely resembling production before merging to the main branch.
- Stage: Corresponding to the main branch, this environment mandates that all changes undergo a Pull Request review process.
- QA: This environment houses the version that’s scheduled for the next production release. A series of automated and manual tests are performed daily against this environment to validate its quality and functionality.
The figure below illustrates a high level overview of the development process.
This workflow had been working great for us until late 2020. Our front-end team had then scaled to a point where a single shared experimental environment could no longer fit everyone’s needs. Some of the problems we encountered were:
- Build Delays: Prolonged build times due to congestion in the build queue.
- Simultaneous Push Issues: Concurrent pushes to the experimental branch causing rejection of some changes.
- Divergence and Resets: The experimental branch would deviate significantly from the main (staging) branch, and would require frequent resets.
- Unstable automated tests: The frequent changes in the experimental environment would lead to recurring failures of our automated tests. It would also be unclear which changes were breaking our end-to-end tests so developers and reviewers were not able to merge pull requests to the main branch with confidence.
- Pipeline failures: In rare cases, a single developer’s oversight could break the build, causing deployment issues for everyone else and resulting in a collective slowdown.
It became evident that developers required a more isolated testing environment before merging changes into the main branch. The optimal solution would address the issues mentioned above.
Our shared environment deployment
Our front-end monorepo currently consists of eleven React apps with possibly more to be added. What’s important to know is that several of those builds are hosted under the same domain name in our Stage, Experimental, QA and Production environments.
Our self-managed NGINX servers serve the static files generated by the React builds and act as proxies for certain backend services. Additionally, we leverage AWS CloudFront for edge caching purposes, optimizing the delivery of these static files.
When it comes to hosting multiple React apps under a shared domain using NGINX, a straightforward configuration might resemble the following:
location / {
  root /app1;
  try_files $uri $uri/ /index.html;
}

location /assets {
  alias /app1/assets/;
  try_files $uri $uri/ =404;
}

location /app2 {
  alias /app2;
  try_files /index.html =404;
}

location ^~ /app2/assets {
  alias /app2/assets;
  try_files $uri $uri/ =404;
}
This configuration serves two React apps, directing requests to the root path to the first app and requests to /app2 to the second app, ensuring proper handling of static files and routing to each app’s index.html. Our aim was to recreate this setup for Previews in order to maintain consistency with our shared environment.
Our Shared environment Pipeline
Given the amount of builds, it was already challenging enough to reduce our build time. Our pipeline for the Stage environment would take around 40 minutes for a single deployment at the time. This was before we migrated to Vite.
Here is a brief overview of the steps that our staging pipeline would follow on Jenkins:
- Fetch the repository.
- Install NPM dependencies.
- Build all front-end apps sequentially.
- Upload the builds to S3.
- Run our deploy script to replace the versions on the NGINX servers.
We attempted building in parallel for some time in order to reduce our build times but we found that our builds would use a varying amount of resources for each app that was being built so it was difficult to balance the processes in a way that would utilize our machine’s resources to the fullest.
Luckily Github Actions were gaining some popularity at the time and had some parallelism features that would later help us easily address those issues.
Designing the first version of Previews
Just like in our shared environments we wanted to have a similar URL structure. The URL would be structured as: https://<id>.<subdomain>.example.com. For our use cases, it made most sense to use the Jira reference as an identifier for the feature preview. So for example a deployment corresponding to the Jira reference “kahoot-1234” would look something like this https://kahoot-1234.<subdomain>.example.com.
The deployment
The next step was to decide where to host those preview environments. Since our back-end team had already started using Kubernetes extensively as a place to host and deploy their apps and we already had a testing cluster on GCP at our disposal, we decided to use that.
The idea was simple. For every domain we would:
- Package a Docker image running NGINX to serve the appropriate apps.
- Push the image to Google’s Container Registry.
- Create a Kubernetes Deployment, Service and Ingress to serve the app.
Why Kubernetes ?
On the one hand this looked like a wasteful approach but it had a few benefits:
- The configuration was as close to our shared environments as possible.
- Building and deploying was easy.
- We already had a pattern of configuring a set of allowed ingress IPs in through our deployed NGINX Ingress controller.
- The external services were being called through proxies. This made the builds configurable and allowed front-end developers to point to an experimental build of a REST API by simply modifying the environment variables in the Kubernetes deployment.
The pipeline
As mentioned previously, Github Actions helped us parallelize the builds so that the time to deployment would be at roughly 15 minutes. Those build times had almost doubled since.
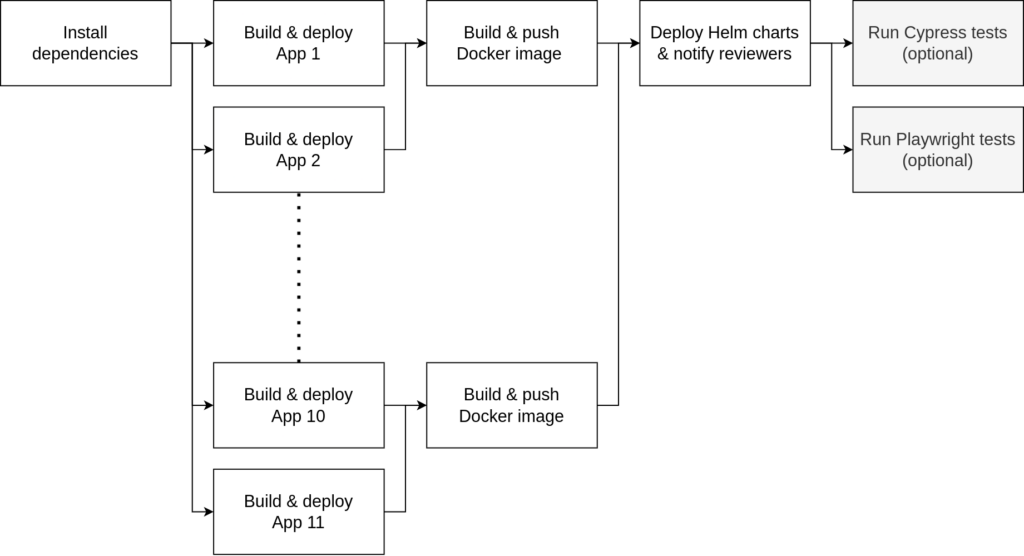
As shown in the figure above, for every Pull Request our workflow would:
- Install the NPM dependencies
- Build every app in parallel using a separate runner
- Download the builds of a single domain group in a separate runner per group and package them into a Docker image to push to GCR.
- Deploy everything to Kubernetes using Helm.
- Optionally, execute our end-to-end tests (Cypress & Playwright) against the newly deployed Previews.
Clean-up
Those deployments would reserve some resources on our Kubernetes cluster. They would have to be cleaned after a Pull Request is reviewed and merged/closed. That’s why we also wrote an action responsible for cleaning up those Kubernetes resources and would trigger using the closed event.
Problems
Some of the problems with this approach are quite obvious. It was too expensive on resources since every pod required a little bit of memory and CPU.
The front end team would also at times introduce new apps making the build times slower.
To make matters worse, we found that the cleanup action would occasionally fail, resulting in zombie previews being left behind, and those would require manual cleaning.
Redesigning Previews
It was obvious that this approach did not scale anymore. The Kubernetes cluster would serve too many previews at the same time which would sometimes reserve a big part of its resources. The pipelines would also take too long until all of the Previews would deploy (30m for the slowest deployment). We therefore decided to continue iterating on the implementation of Previews and came up with the following design.
The deployment
We decided to recreate the Preview setup that we had in Kubernetes by pairing Amazon’s Cloudfront and S3 as origin. This is a common setup for serving static sites with edge caching and without even hosting a server.
The features that we needed to replicate were:
- Routing: The correct Preview version and React app should be loaded using the same rules as before
- Ingress Firewall: Access should be restricted to our company IP ranges
- Ease of deployment
The first step was to create a Cloudfront deployment and a S3 bucket. We created a custom Terraform module to manage such deployments internally.
We specifically configured our module to:
- Have a default behavior that caches requests for up to 60 seconds.
- Create a *.example.com certificate as well as a DNS entry pointing to our distribution. The wildcard is important because it means that any subdomain will be accepted (e.g kahoot-1234.group1.example.com).
- Create a Cloudfront function that handles the routing.
To keep things simple, a single bucket was created for all of the React apps and Previews. Every build within that bucket was prefixed with the following string: “<id>/<app-name>”. So for example, a deployment of App1 with a Preview ID (Jira tag), kahoot-1234 would be stored in “kahoot-1234/app1/”. The tricky part was implementing the routing to the correct files. This is what the following Cloudfront function is doing.
// Runtime: CloudFront Viewer Request
// Rewrite url paths based on the host and path
// e.g https://kahoot-1234.group1.example.com/assets/abc.png and https://kahoot-1234.group1.example.com/
// refer to /kahoot-1234/app1/assets/abc.png  and /kahoot-1234/app1/index.html in the origin bucket.
// The values :id and :uri in the config are replaced with the ticket id and the path after the host respectively.
// This file should be kept in ES5 for compatibility with CloudFront.

var config = {
  "group1"
    root: "/:id/app1", // The default app for this subdomain is app1
    locations: {
      "/app2/assets": "/:uri",
      "/app2": "/app2/index.html",
      "/assets": "/:uri",
      "/": "/index.html"
    }
  },
  "group2": {
    root: "/:id/app3",
    locations: {
      "/app4/assets": "/:uri",
      "/app4": "/app4/index.html",
      "/assets": "/:uri",
      "/": "/index.html"
    }
  }
}

function handleLocations(hostConfig, id, uri) {
  var root = hostConfig.root.replace(/:id\b/g, id);
  var locations = hostConfig.locations;

  var selectedLocation = Object.keys(locations)
    .find(l => !!uri && uri.startsWith(l));

  var location
  if (!!selectedLocation && !!locations[selectedLocation]) {
    location = locations[selectedLocation]
  } else {
    location = locations["/"]
  }

  return `${root}/${location.replace(/:uri\b/g, uri)}`
    .replace(/(?<!:)\/+/gm, '/'); // replace double slashes except for the ones after the colon
}

function getHostConfig(host) {
  var subdomain = host.split('.')[1] // host subdomain (e.g. group1, group2)

  switch (subdomain) {
    case 'group1':
      return config["group1"];
    case 'group2':
      return config["group2"];
    default:
      return config["group1"];
  }
}


function handler(event) {
  var request = event.request;
  var host = request.headers.host.value;
  var id = host.split('.')[0]; // ticket id (e.g. kahoot-1234)
  var uri = request.uri;

  var hostConfig = getHostConfig(host)
  var newUri = handleLocations(hostConfig, id, uri)

  request.uri = newUri

  return request;
}
The handler function is the one being called by Cloudfront which passes an event object with some request headers. Using the “host” header we are able to extract the subdomain from our URL and then determine which configuration to load based on that. If you’re familiar with NGINX configurations you may recognize this functionality since it is similar to the variable “server_name”. The different configuration blocks are also imitating NGINX’s “root” variable and “location” blocks.
The deployment process consists of two steps:
- Uploading all of the files in the build excluding the .html files.
- Uploading all of the .html files.
The reasoning behind this sequence of steps is to not have any point in time during the deployment where an html file is referencing a file that has not been uploaded yet.
This logic has been packaged in a custom Github Action that we use internally.
The pipeline
Since we no longer build Docker images and Helm charts our deployment pipeline has now been simplified a lot and it is also much faster than before.
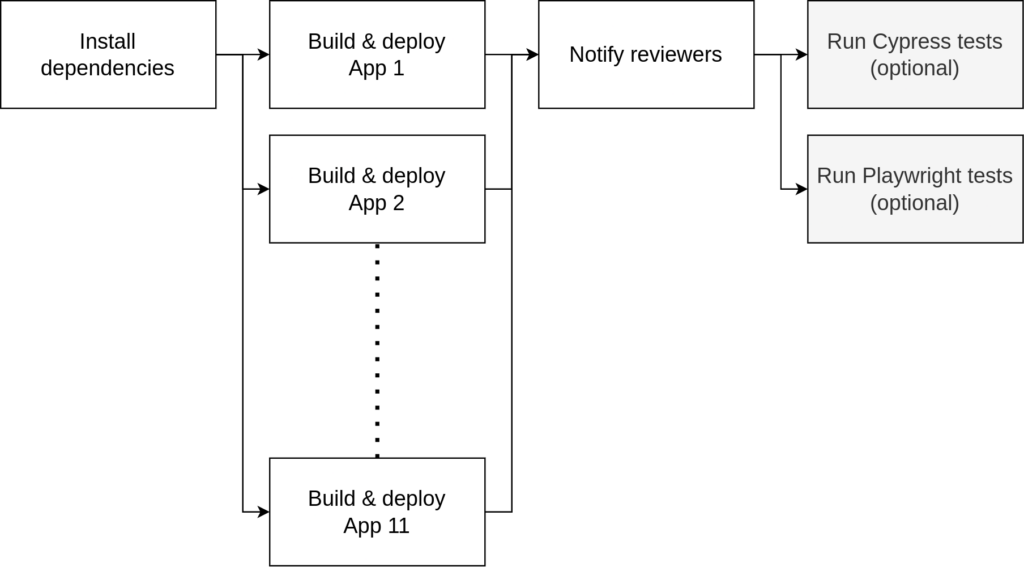
The figure above illustrates the new structure of our Github Actions pipeline. What’s important is that now all apps are being built in parallel and are deployed right after by the same runner.
Every app is also deployed independently so that no time is wasted by:
- waiting for some of the slower builds to complete
- building Docker images
- network I/O between the runners
With this setup, the time to the first deployed build can now range from 2 to 3 minutes with the slower ones averaging at about 10 minutes. When all of those builds and deployments are complete, the pipeline notifies the developer by commenting on their Pull Request. The cost savings compared to running Kubernetes containers were quite significant as well. It is now almost 30 times cheaper for us to host those apps.
Summary
In this post we covered some of the challenges of shared testing environments as well as why Pull Request deployments are important to us. We also went into detail about the design of our previous and current implementations as well as the differences between them.